Friday, September 25, 2009

Chair Make-Over


I was finally able to finish my chairs project! These are the chairs I bought on Craigslist last week for $20 (for 4). Sorry about the picture--it is overcast right now. I think they turned out really good! Painting them a creamy white makes all the details stand out. If I hadn't given myself a deadline with this chair project (one week) they would probably be taking up space in our garage for months! We would also still be having dinner sitting on an array office and lawn chairs. I am very happy with the result. I'll be sure to post a picture of the dining room with a table setting and the new chairs.
I have been working on other projects as well. I will be sure to update some more pics this weekend. Have a great Friday!

Sunday, September 20, 2009

Painted Chairs Project


I haven't updated recently because I have been pretty busy with several DIY home decorating projects. I found these wooden chairs on Craigslist-- $20 for 4! We were in desperate need of matching dining room chairs and not even my budget is so tight that I couldn't spare $20 bucks! Yes, they are a little beat up, but they are very sturdy and %100 real wood. I like the detail on the front legs and the carving at the top. I decided to paint them a nice creamy ivory and reupholster the seat in a light cream colored fabric.
Our dining room is basically the sunroom. I love all the natural light we get in there and decided to keep all the furnishings and fabrics cream and white. The plus to keeping it all white is that decorating the room should be pretty easy. Lots of ivory painted furniture. I started spray painting these this afternoon and decided I was better off painting them. So I switched to paint. Tommorrow I will give them the final coat-all that is left to do is find a fabric for the seats. I am trying to use fabric I already own but I may have to break down and buy something at the fabric store if I don't find what I need in my fabric stash. Stay tuned for the after pictures....

Wednesday, September 16, 2009

Cutting Garden


Lately, I have been on this floral arrangement kick. I've already made three arrangements out of artificial flowers. My quest for better thrifty arrangements led me to the book Arranging Flowers by Martha Stewart. In it she shows photographs of her cutting garden from her Turkey Hill home. She offers suggestion for starting a cutting garden from seeds for as little as $20. I love the idea of a cutting garden! I think it is so romantic! What a gift to be able to go out into your backyard and pick fresh flowers for your home from Spring until Fall. Now that is Romantic Thrifty Living.
I think this will be my gardening project for next year. It may be too late this year as we are heading into fall soon. That is so exciting! I will write more about that later.

Monday, September 14, 2009

The Design Star Winner is......


The Design Star Challenge winner is Antonio! I watched the show last night and thought both Dan and Antonio did an amazing job. However, I was in agreement that Antonio should have won. I liked Dan and thought he was a really good designer, but I think Antonio had a more unique approach to design than all the rest. But bottom line I think he was more refreshinging and more natural in his "tv show host" duties. I would be less bored to see his show in the end--I think. So congratulations to Antonio! I will be watching his first show next weekend on HGTV.

Friday, September 11, 2009

Another Thrift Store Make-Over!


This is my latest project. I really love how it turned out! It adds and element of texture to any room. I bought this brass platter while thrifting. These platters have probably filled many landfills as I always see them at the thrift stores I shop--both in Texas and Oklahoma. I believe they are probably circa 1960's or 1970's. I loved the scroll detail on this one and decided to give it an aged treatment to bring out the detail. I think it turned out great!

I decided to try an aging technique courtesy of Cindy from My Romantic Home. First, I spray painted it a satin cream color. Then I diluted burnt umber (brown) craft acrylic paint with water--use more paint than water. Next, I used a brush to apply the dark paint into the crevices. Then with a slightly damp paper towel I wiped the dark paint off the raised parts. The nice thing is that even after it has dried you can still take a damp paper towel and wipe some more of the dark off. It was a fun and easy project! Now, I am on the look out for more of these platters.

Sunday, September 6, 2009

Cheap & Easy Topiary!


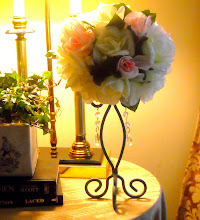
This is a topiary I made this weekend. I found this great tip on You Tube on how to make a round topiary out of a square block of floral foam. Round floral foams are usually more pricey. You can get rectangular foams for as little as a dollar. I cut the foam all around with a spackle tool to soften all the hard edges. Then I hot glued floral moss all around to add bulk. The rest of the project was all about the roses. First I hot glued the white roses-spacing them all around. I filled the empty spots with the leaves from the rose bushes. Finally, I filled in the empty spots with 7 pink roses. The topiary ball is sitting on top of a wrought iron candle holder which I got from a thrift store. Very nice results for a very reasonable price.


The materials used where foam, moss, 3 artificial rose bushes (7 roses on each)--all from Dollar Tree! The entire project was done for about $5.

Picture Frame Make-Over


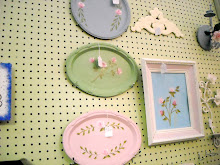
This was a cheap and simple little project. The frame was a $1 Goodwill purchase. All I did was paint the matting and the frame. This will hang in my bedroom which I am decorating light blue, and cream with a touch of rose colored accents in the shabby chic style.